

Homemade English Muffins: Better Than Store-Bought!


This post may contain affiliate links. Please see my Disclosure, Privacy and Terms of Use for more information.
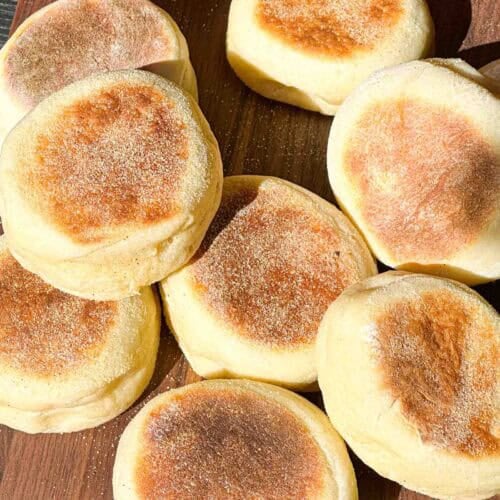
If you’ve ever had a toasted English muffin slathered in butter and honey, you know it’s a simple pleasure that can make any morning feel special. My husband is a huge fan — English muffins with a generous swipe of butter and a drizzle of honey are his favorite way to start the day. For a long time, we bought them from the store, but I was always a little suspicious of how long they lasted on the shelf without ever getting moldy or stale. Making homemade English muffins has completely changed our mornings. These classic breakfast breads are so much fresher and tastier than anything you’ll buy at the store. Curiosity (and a bit of concern over the ingredient list) finally led me to try making English muffins at home. The result? They taste so much better, have a beautiful texture, and I know exactly what’s in them. Plus, they freeze perfectly — just pop them out of a ziplock bag whenever you need a fresh, homemade breakfast. Homemade English muffins are a freezer-friendly breakfast option that’s both healthy and delicious. Once you try these, you might never go back to store-bought again!
Why You’ll Love This Recipe
- Simple Ingredients: No preservatives or weird additives — just wholesome pantry staples.
- Unbeatable Freshness: Homemade English muffins are soft inside, perfectly chewy, and have that signature “nook and cranny” texture.
- Freezer-Friendly: Make a big batch, freeze, and enjoy fresh muffins anytime.
- Customizable: Add whole wheat flour, seeds, or even cinnamon and raisins for variety.
- Better for You: No mystery ingredients, just real food.
- Budget-Friendly: Homemade is much cheaper than buying high-quality muffins at the store.
- Perfect for meal prep, these easy English muffins are a make-ahead breakfast that the whole family will love. This recipe is ideal for anyone looking for a healthy breakfast bread without preservatives.
Some History
English muffins have a long and interesting history. Originating in the United Kingdom, they were first popularized in the 19th century as a griddled bread served at tea time.Unlike American “muffins,” which are more like cupcakes, English muffins are yeast-leavened and cooked on a skillet, giving them their signature texture and flavor. They became a breakfast staple in the US, especially after being featured in Eggs Benedict and other classic dishes.Today, English muffins are a popular choice for breakfast sandwiches, eggs Benedict, and as a base for a variety of sweet or savory toppings. Learning to make them at home means you can enjoy this bakery favorite anytime you want!

Comparisons
How do homemade English muffins stack up against store-bought? The difference is night and day!Store-bought versions often have a long shelf life thanks to preservatives, but they can be bland, dry, or strangely chewy. Homemade muffins are fresh, flavorful, and have a perfect balance of soft interior and crisp, golden exterior. Plus, you can control the size, thickness, and even the level of toastiness.When you make your own English muffins, you get that authentic “nooks and crannies” texture and unbeatable taste, perfect for toasting and topping with your favorite spreads. This easy English muffin recipe delivers better flavor and texture than anything you’ll find in a package.
Homemade vs. Storebought
One of the main reasons I started baking English muffins was the ingredient list on the packaged ones. Why do they last so long? Preservatives and additives, mostly. When you make them yourself, you get to skip all that.Homemade muffins are made with flour, yeast, milk, butter, a touch of sugar, and salt — nothing more. They freeze beautifully, so you can make a big batch and enjoy them whenever you want. And trust me, the taste is worth every minute!Homemade English muffins are a clean-label, healthy alternative to store-bought. You’ll taste the difference with every bite!
Fun Facts about English Muffins
- English muffins aren’t actually baked in the oven—they’re cooked on a griddle or skillet!
- The signature “nooks and crannies” are created by a high-hydration dough and gentle handling.
- In the UK, English muffins are simply called “muffins” — what Americans call “muffins” are called “fairy cakes” or “American muffins” there.
- English muffins were a favorite of Victorian-era street vendors, who sold them door-to-door in London.
- They’re an essential part of Eggs Benedict, a brunch classic.
- The original Thomas’ English Muffins recipe is a closely guarded secret.
- Homemade English muffins can be split with a fork for maximum texture — never use a knife if you want those craggy edges!
- Try using your homemade English muffins for breakfast sandwiches, mini pizzas, or even as a base for eggs florentine. They’re incredibly versatile!

💡Tips & Tricks and Variations
- Don’t Overwork the Dough: Gentle mixing and handling keep the muffins light and full of air pockets.
- Use Cornmeal: Dusting the muffins with cornmeal before cooking gives them that classic crust.
- Cook Low and Slow: Keep the heat medium-low so the muffins cook through without burning.
- Customize: Add whole wheat flour for fiber, or mix in cinnamon and raisins for a sweet twist.
- Split with a Fork: For the best texture, poke a fork all the way around the edge and pull apart—don’t slice!
- Freeze for Later: Cool completely, then freeze in a ziplock bag. To reheat, just toast straight from the freezer.
➡️ For gluten-free English muffins, use a gluten-free flour blend. For dairy-free, substitute plant-based milk and vegan butter. You can also add seeds or dried fruit for extra nutrition and flavor.
🥜 Substitutions & Allergy Info
- Dairy-Free: Use plant-based milk and vegan butter.
- Egg-Free: Even though this recipe calls for an egg, it is not needed. An egg adds richness, moisture, and structure to the muffin, but can be left out and is optional to use.
- Whole Wheat: Substitute up to half the flour with whole wheat for a heartier muffin.
- Gluten-Free: Use a gluten-free flour blend, but expect a slightly different texture.
➡️ This English muffin recipe is easy to adapt for most dietary needs, making it a great choice for families and anyone with food allergies.

Ingredients You Need
- Bread Flour: Gives the muffins structure and chew.
- Yeast: Creates the rise and the classic “nooks and crannies.”
- Milk: Adds richness and tenderness.
- Butter: For flavor and a soft crumb.
- Sugar: A touch helps feed the yeast and browns the crust.
- Salt: Balances the flavors.
- Cornmeal: For dusting and that classic English muffin crunch.
➡️ High-quality, fresh ingredients make all the difference in homemade English muffins. Use bread flour and active yeast for the best results.
How to Make English Muffins
Homemade English muffins might sound tricky, but they’re really just a simple yeast dough cooked in a skillet instead of the oven. Take your time with the steps below, and you’ll be rewarded with soft, chewy muffins full of those perfect little nooks and crannies.
Step 1: Wake up the yeast. In a medium bowl or large glass measuring cup, stir together the milk, water, and sugar until the sugar dissolves. Warm it in the microwave until it reaches 110°F. That’s warm like a bath, not hot. If you have a thermometer, use it here. Too hot and the yeast won’t work. Sprinkle the yeast over the top, give it a gentle stir, and let it sit for 5 to 7 minutes. When you see a foamy layer on top, your yeast is alive and ready to go.
Step 2: Mix the dry ingredients. While the yeast is getting foamy, add the flour and salt to the bowl of your stand mixer and whisk them together. Attach the paddle to your mixer.
Step 3: Add the butter and egg. Whisk the melted butter and the egg (if you’re using it) right into the foamy yeast mixture. The egg is optional, but it makes the muffins a little richer and softer.
Step 4: Make the dough. Turn your mixer on low and slowly pour the wet mixture into the flour. Once everything comes together, turn the speed up to medium-high and let it mix for about 7 minutes. The dough will start out sticky and turn smooth and stretchy. That stretchiness is what gives English muffins their chewy texture.
Step 5: Let it rise. Move the dough to a large, lightly oiled bowl and cover it with plastic wrap. Set it somewhere warm and let it rise for about 1 hour, until it’s doubled in size.
Want even more flavor? Pop the covered dough in the fridge overnight instead. The slow, cold rise gives the muffins a deeper, slightly tangy flavor. Just let the dough sit at room temperature for about an hour before shaping.
Step 6: Get your baking sheets ready. Line two baking sheets with parchment paper and sprinkle them with cornmeal. The cornmeal keeps the muffins from sticking and gives them that classic crunchy bottom.
Step 7: Shape the muffins. Turn the dough out onto a lightly floured counter. Gently pat it out with your hands until it’s just under 1 inch thick. Try not to press too hard, so you keep all those air bubbles inside.
Step 8: Cut them out. Use a 3-inch round cutter to cut out your muffins. Carefully move each one to the baking sheets with a spatula or your hands. Gather up the scraps, gently pat them out again, and cut out a few more.
Step 9: Let them rise again. Cover the muffins loosely with plastic wrap or a kitchen towel and let them rise in a warm spot for about 30 minutes. They’ll puff up just a little.
Step 10: Heat the skillet. Place a large skillet or griddle on the stove over very low heat. This is the most important part! If the pan is too hot, the outside burns before the inside is cooked. To check it, hold your hand a few inches above the pan. It should feel gently warm, not hot.
Step 11: Cook the muffins. Sprinkle a little cornmeal in the pan and carefully add 3 or 4 muffins, leaving space between them. Cover the pan with a lid and cook for 5 to 6 minutes. Gently flip them over, cover again, and cook for another 5 to 6 minutes, until both sides are golden brown and the muffins are cooked all the way through.
Step 12: Cook the rest. Wipe out the old cornmeal before each new batch, since it can burn, and add a fresh sprinkle. Then cook the next muffins the same way.
Step 13: Enjoy! English muffins are best warm. Don’t cut them with a knife, though. Split them open with a fork instead. That’s how you get all those crispy little nooks and crannies for butter and jam to melt into.
Debbie’s tip: If this is your first time making English muffins, cook one test muffin first. Every stove is a little different, and this helps you find the perfect heat and timing before you cook the whole batch.
‼️ Pro Tips
- For the best flavor, let the dough proof for 4–8 hours, though 1 hour works if you’re short on time.
- A stand mixer is recommended since the dough is sticky and can be tricky to handle by hand.
- Using bread flour instead of all-purpose will give your English muffins a chewier texture.
- Let the dough rise in a warm, draft-free place (not hot or in direct sunlight) for optimal results.
- No round cutter? Shape the dough into rounds by hand.
- If your muffins are under-baked and too soft in the middle, bake them at 350°F for about 3 minutes to finish.
- If the muffins stick to the pan, add a tiny bit of butter to help release them.
- A cast-iron skillet or griddle is ideal for even cooking.
- Cook the muffins in batches, brushing away excess semolina or cornmeal between each batch to prevent burning.
- Use a fork to split the muffins before serving for those signature nooks and crannies.
- English muffins are best enjoyed toasted for maximum flavor and texture.
- Storage: Keep cooked English muffins in an airtight container for 3–5 days, or freeze for up to 3 months.
❄️ Storage and Freezing
- Room Temp: Store in an airtight container for up to 5 days.
- Freeze: Cool completely, place in a ziplock bag, and freeze for up to 2 months. Toast straight from the freezer — no thawing needed!
- Homemade English muffins are perfect for meal prepping — just make a big batch, freeze, and enjoy a homemade breakfast any day of the week.

FAQ – about English Muffins
Can I make English muffins ahead of time?
Yes! They freeze beautifully. Just cool, zip, and freeze.
Why are my muffins dense?
Overworking the dough or not letting it rise enough can make them dense. Be gentle and patient!
Can I cook these in the oven?
They’re best on a skillet, but you can finish them in a 350°F oven for 5 minutes if you’re worried about the centers being underdone.
How do I get the “nooks and crannies”?
A sticky, well-hydrated dough and gentle handling are key. Always split with a fork!
What’s the best way to toast them?
Slice (or fork-split), then toast until golden. They’re delicious with butter, honey, or jam.
Can I add flavors?
Absolutely! Try cinnamon-raisin, whole wheat, or even cheese and herbs.
Do I need special equipment?
Nope! A skillet or griddle and a round cutter (or glass) are all you need.
Troubleshooting Tips
- Muffins too pale or doughy inside:
Lower the heat and cook longer, or finish in the oven for a few minutes. - Muffins too flat:
Make sure your yeast is fresh and let the dough rise fully. - Burnt bottoms:
Use medium-low heat and check often; every stove is different. - For perfect results, always let your muffins cool before splitting and toasting.
Related Recipes
✅ Crusty Artisan Bread
✅ The Swabian Pretzel
✅ Sandwich Bread
✅ Greek Yogurt Bagels
➡️ Check out my other homemade bread and breakfast recipes for more delicious ideas!
Wrapping Up
Making English muffins at home is easier than you might think — and the results are so much better than anything you’ll find in a package. No preservatives, no mystery ingredients, just fresh, flavorful muffins perfect for breakfast or anytime. My husband loves them toasted with butter and honey, and I love knowing exactly what’s in every bite. Make a batch, freeze the extras, and enjoy a homemade breakfast whenever you want!
➡️ Once you try this easy English muffin recipe, you’ll never want to go back to store-bought. Enjoy your healthy, homemade breakfast!
Enjoy every bite,

Homemade English Muffins: Better Than Store-Bought!
Ingredients
- 2 3/4 cups all-purpose flour
- 2 teaspoons instant yeast
- 1 teaspoon salt
- 2 tablespoons sugar
- 3/4 cup milk
- 1/2 cup water
- 3 tablespoons butter melted
- 1 egg large, room temperature optional
- cornmeal or Semolina for dusting
Instructions
- In a medium bowl or large glass measuring cup, combine the milk, water, and sugar. Stir until the sugar dissolves, then warm the mixture in the microwave until it reaches 110°F. Sprinkle the yeast over the warm liquid, stir gently, and set aside for 5–7 minutes, or until a foamy layer forms on top.
- Meanwhile, add the flour and salt to the bowl of your stand mixer and whisk together. Attach the paddle to your mixer.
- Whisk the egg (optional) and melted butter into the milk and yeast mixture. With the mixer running on low speed, slowly pour the wet ingredients into the flour mixture. Once combined, increase the mixer speed to medium-high and mix for about 7 minutes, or until the dough is smooth and elastic.
- Transfer the dough to a large, lightly oiled bowl and cover with plastic wrap. Let it rise in a warm place until doubled in size, about 1 hour. For even more flavor, you can refrigerate the dough overnight; just let it come to room temperature for an hour before using.
- Turn the dough out onto a floured surface and gently pat it out to just under 1 inch thick. Line two baking sheets with parchment and dust with cornmeal.
- Using a 3-inch round cutter, cut out your English muffins. Gently transfer each round to the prepared baking sheets with a spatula or your hands. Re-roll and cut the remaining dough as needed. Cover the muffins loosely with plastic wrap or kitchen towel and let them rise in a warm spot for about 30 minutes.
- Heat a large skillet or griddle over very low heat. When the surface feels warm a few inches above, sprinkle with cornmeal and carefully arrange 3–4 muffins in the pan. Cover and cook for 5–6 minutes, then gently flip and cook for another 5–6 minutes until golden and cooked through.
- Brush away any old cornmeal and add a fresh sprinkle before cooking the next batch. Enjoy the muffins warm! If it’s your first time, try cooking a test muffin to get the timing just right.




There is no egg in the recipe, and it says not egg in the allergen se til . But the recipe instructions call for an egg, and there’s and egg in the picture, so do I add the egg?
Hi Taylor,
the egg is optional. It adds some richness to the English muffin, but is not necessary to use. So recipe can be made without an egg. Personally I always add the egg. It makes the muffin softer and fluffier, but again it is optional. I hope that answered your question. Thank you for pointing this out, it was confusing. ☺️
easy an explicit recipe to follow.
Thank you Dawn 😁