Grilled Pizza Recipe (Closer to Italy Than You Think!)

Servings: 12 Total Time: 30 mins Difficulty: Beginner Dairy Free Egg Free
Skip the oven and fire up the grill. This grilled pizza recipe delivers a crispy crust, smoky flavor, and authentic Italian-inspired results.
grilled pizza on a round wooden board cut in 4 pieces pinit

Let me tell you something I am not particularly proud of. Growing up in Germany, my parents took my brother and me to Italy regularly — often for summer vacation. The food, the warmth, the culture, the pizza fresh out of a wood-fired oven. And I, as a child, thought it was boring.

I would like to insert a face palm here. Because I could absolutely slap my head for that now.

What I wouldn’t give to go back to those summers — to sit at a table in Italy with a pizza in front of me, the smell of the wood fire, the herbs, that crust. Once you’ve tasted a real Italian pizza, nothing else quite measures up. Not restaurant pizza here, not frozen pizza, not even homemade pizza baked in a regular oven. There’s something about that heat, those herbs, that philosophy of simplicity that is almost impossible to recreate.

Almost.

Why You’ll Love Pizza on the Grill 

This isn’t your average backyard pizza night. Here’s why this method is worth doing right.

  • The grill gets hot enough to actually mimic a wood-fired oven — something your kitchen oven simply can’t do.
  • That signature blistery, charred crust with a soft, airy inside?
    It’s possible at home.
  • Completely customizable with whatever toppings you love.
  • A fun, interactive cooking experience — especially with family.
  • Once you try grilled pizza, oven pizza starts to feel a little disappointing.
  • And if you do it right — the herbs, the simplicity, the heat —
    it gets remarkably close to Italy.

A Little Confession

My parents believed in traveling. Every summer, we packed up and headed south — my brother, my parents, and me — usually to Italy.

Debbie Hauck - the face behind Debbies Kitchen Corner
As a kid, I didn’t fully understand what I had. Italy felt like just another vacation destination, warm and a little slow, full of old things and unfamiliar food.

I know. Face palm.

What I do remember, even then, is the pizza. Not because I appreciated it the way I do now, but because it was impossible not to notice. The smell coming out of those restaurants — wood smoke and fresh herbs and something caramelized and bubbling — stopped you on the street. The crust had this char on it, blistery and crisp at the edges but somehow still soft and airy inside. The toppings were minimal. The sauce was barely cooked. A few leaves of basil were laid on top right at the end. A drizzle of olive oil.

It ruined me for every other pizza. I just didn’t know it yet.

Years later, living in Oregon, I started trying to chase that memory. Oven pizza never got me there — the temperature just isn’t high enough; the results are always a little soft, a little pale, a little safe. So I turned to my gas grill. I tested, adjusted, tinkered — honestly, that’s the only word for it — until I got somewhere real. Not Italy. I won’t pretend it’s Italy. But closer than I ever thought possible in a home kitchen.

Pizza fresh from the grill and still hot and bubbling

What matters most is the heat and the patience. Get both of those right, and something genuinely special happens.

I hope one day I can go back to Italy and taste the real thing again. Until then, this grill and these herbs will have to do — and honestly, they’re doing a pretty remarkable job.


What Makes Italian Pizza Different?

Before we get into the method, it helps to understand what you’re actually chasing. Authentic Italian pizza — particularly Neapolitan style — is built on four fundamental pillars, and they’re all simpler than you’d expect.

Barely cooked tomato sauce. Italians don’t simmer their pizza sauce for hours. They use high-quality crushed San Marzano tomatoes, a pinch of sea salt, and a splash of olive oil — raw. That’s it. The heat of the oven does the cooking.

Minimal toppings. Authentic Italian pizzas are not loaded. A classic Margherita has crushed tomatoes, fresh mozzarella, basil, and extra virgin olive oil. That’s four ingredients. The restraint is the point — every element needs to stand on its own.

Extreme heat. Authentic Neapolitan pizzas are baked at 800°F to 900°F for just 60 to 90 seconds. That flash-bake is what creates the characteristic blistered crust — crisp and charred on the outside, soft and airy within.

Extra virgin olive oil. A generous drizzle of good quality, fragrant olive oil — either just before the pizza goes on the heat or right as it comes off — ties everything together and adds that unmistakable richness.

Keep these four things in mind and you’ll understand why this grill method works as well as it does.

The Magic Herbs

If there’s one thing that will take your grilled pizza from “really good” to “this tastes like Italy,” it’s the herbs. Don’t skip them, don’t substitute dried for fresh where it matters, and don’t overdo it.

  • Fresh basil — the soul of a great pizza. It has a vibrant, sweet, slightly peppery aroma that no dried herb can replicate. The key is to add it after the pizza comes off the grill — the residual heat releases the oils in the leaves without burning them. A few torn leaves is all you need.
  • Dried oregano — particularly important in Southern Italian and Sicilian pizza traditions. It has a deeply concentrated, earthy, savory flavor that blooms beautifully in heat. A small pinch sprinkled over the sauce or directly onto the cheese before grilling makes a noticeable difference.
  • Garlic — a touch of garlic powder in the dough adds a subtle depth, but freshly sliced or minced garlic on top, drizzled with olive oil, takes it further.
  • Red pepper flakes — optional but wonderful for a little heat against the richness of the cheese.
  • Extra virgin olive oil — not just a cooking fat here but a flavor ingredient. Use the best quality you have and drizzle it generously.
grilled pizza slice held in hand

Ingredient Spotlight

For the dough:

  • Warm water — activates the yeast. It should feel like warm bathwater — not hot, not cool.
  • Dry yeast — the rising agent. Combined with a little sugar and warm water, it blooms into a foamy, active starter in about 10 minutes.
  • Sugar — feeds the yeast to get it going. Just a teaspoon is all it needs.
  • All-purpose or bread flour — both work here. Bread flour gives you a slightly chewier, more pizza-parlor-style crust. All-purpose is a little lighter and more tender.
  • Olive oil — adds flavor and keeps the dough pliable and easy to work with.
  • Salt — essential for flavor. Add it after the yeast mixture so it doesn’t inhibit the yeast.
  • Garlic powder (optional) — just a quarter teaspoon in the dough adds a subtle savory note that pairs beautifully with Italian toppings.

🛠️ Kitchen Tools 

A few things that make the grilling process smoother and safer.

  • Gas grill with a lid — you need to be able to get to high heat and hold it
    👉Monument Mesa 4-Burner Gas Grill
  • A grill thermometer if your grill doesn’t have one built in
    👉 Grill Thermometer
  • Pizza peel or a flat baking sheet for transferring the dough to and
    from the grill
    👉 Pizza Peel
  • Tongs for adjusting the dough on the grates
  • Rolling pin for shaping the dough
    👉 Wooden Rolling Pin
  • A timer — seconds matter at these temperatures

How to Make Grilled Pizza

Read through the whole method before you start — the grill moves fast and you want to be ready.

Make the dough:

  1. Combine the warm water, yeast, and sugar in a large bowl. Stir gently and let sit for 10 minutes until foamy and fragrant. If it doesn’t foam, your yeast may be old — start over with fresh yeast.
  2. Add the flour, olive oil, salt, and garlic powder if using. Mix until a shaggy dough forms, then knead by hand or with a stand mixer for about 5 minutes until smooth and elastic.
  3. Cover the bowl and let the dough rest in a warm place for 30 minutes until slightly puffed.
  4. Divide the dough in half. Each half makes one medium to large pizza. Roll out on a lightly floured surface to your desired thickness — thinner rolls out to a crispier crust.

Grill the pizza:
5. Heat your grill to at least 550°F to 600°F with the lid closed. The hotter the better — 800°F is ideal if your grill can get there. 

6. Carefully lay the rolled-out dough directly onto the hot grill grates. Close the lid and bake for 1 minute — no more than 90 seconds. This pre-bakes one side and gives the crust enough structure to hold your toppings without breaking.

7. Remove the dough from the grill and flip it over so the grilled side faces up.

8. Working quickly, add your sauce, toppings, cheese, and herbs to the grilled side.

9. Return the pizza to the grill, close the lid, and cook until the crust is blistery and charred at the edges — not black, but genuinely crisp — and the cheese is melted and bubbling. Crank the heat as high as your grill will go for this step. 800°F is the target. 10. Remove from the grill, add fresh basil leaves and a drizzle of extra virgin olive oil, slice, and serve immediately.

Topping Ideas 

Part of the joy of grilled pizza is making it your own. Here are some classic and creative combinations to inspire you.

The classics:

  • Margherita: crushed San Marzano tomatoes, fresh mozzarella, fresh basil, olive oil
  • Pepperoni: tomato sauce, mozzarella, pepperoni, dried oregano
  • Four cheese: tomato sauce, mozzarella, provolone, parmesan, gorgonzola
  • Prosciutto and arugula: tomato sauce, mozzarella, thin prosciutto added after grilling, fresh arugula, parmesan shavings

A little more adventurous:

  • BBQ chicken: BBQ sauce, grilled chicken, red onion, mozzarella, cilantro
  • White pizza: olive oil and garlic base, ricotta, mozzarella, spinach, lemon zest
  • Fig and prosciutto: olive oil base, mozzarella, fresh or dried figs, prosciutto, balsamic drizzle
  • Mushroom and truffle: olive oil, mixed mushrooms, mozzarella, fresh thyme, truffle oil drizzle

Keep it simple — the Italian way: Remember the four pillars. Less is more.
A pizza with three great ingredients will always outshine one piled high with
ten average ones.

👩🏻‍🍳 Tips From My Kitchen

Years of grill testing distilled into the things that matter most.

  • Heat is everything. Don’t rush to put the pizza on before the grill is properly preheated. Give it a full 15 to 20 minutes to reach temperature.
  • The pre-bake step is non-negotiable. That first 60 to 90 seconds on the grill without toppings is what prevents the dough from going soggy and breaking under the weight of the sauce and cheese.
  • Work fast once the dough comes off. Add your toppings quickly so the dough doesn’t cool down too much before going back on the grill.
  • Keep toppings minimal. Overloading the pizza prevents the crust from crisping properly and can cause it to break.
  • Fresh basil goes on after, not before. Always add it once the pizza comes off the heat.
  • Use the best olive oil you have. At these temperatures and with this few ingredients, quality really shows.
  • Be patient with the second bake. Watch for the blisters and the bubbling cheese — that’s your signal, not the clock.

Variations

Once you have the basic method down, the possibilities are endless.

  • Sourdough pizza dough: swap the regular yeast dough for sourdough for a more complex, tangy flavor that’s even closer to traditional Italian.
  • Gluten-free: use your favorite gluten-free pizza dough — the grilling method works just as well.
  • Calzone on the grill: fold the dough over the toppings, seal the edges, and grill as a calzone for a fun variation.
  • Dessert pizza: top with Nutella, sliced strawberries, and a dusting of powdered sugar after grilling for a crowd-pleasing dessert.

🫙 Storage

Grilled pizza is really a make it and eat it right now kind of meal — but here’s what to know if you have leftovers.

  • Leftover pizza stores well covered in the fridge for up to 3 days.
  • Reheat in a hot skillet on the stovetop for 2 to 3 minutes — this keeps the crust crispy in a way the microwave never will.
  • Freeze fully baked and cooled slices wrapped individually for up to 2 months. Reheat directly on the grill or in a hot oven.
  • Unbaked dough can be stored covered in the fridge for up to 3 days, or frozen for up to 3 months. Let it come to room temperature before rolling out.

FAQ about Grilled Pizza

1️⃣ Do I need a special pizza grill or stone?
No — direct grill grates work perfectly and actually give you better char than a stone on a regular grill. The direct heat is the whole point.

2️⃣ What if my grill doesn’t get to 800°F?
550°F to 600°F will still give you a great result — just give the second bake a little more time. The higher the heat the closer to Italian, but don’t let perfect be the enemy of delicious.

3️⃣ Can I use store-bought pizza dough?
Yes — store-bought dough works fine with this method. Let it come fully to room temperature before rolling out so it stretches easily.

4️⃣ Why do I pre-bake the dough before adding toppings?
That first 60 to 90 seconds on the grill gives the crust enough structure to hold toppings without breaking or going soggy. Don’t skip it.

5️⃣ Can I make the dough ahead of time?
Absolutely — make it the night before and let it rise slowly in the fridge overnight. A cold, slow rise actually develops more flavor in the dough. Take it out 30 minutes before rolling to come to room temperature.

6️⃣ What’s the best cheese for grilled pizza?
Fresh mozzarella is the classic Italian choice and melts beautifully. Low-moisture mozzarella works well too and is less watery. A mix of mozzarella and provolone is a personal favorite.

Serving Ideas

Pizza on the grill is an event, not just a meal — and in our house, it has become exactly that.

My daughter Jennifer requests this regularly. Not occasionally, regularly. And I’ll be honest — grilled pizza is my domain. Manny is the undisputed grill master when it comes to meat, but pizza? That’s mine. He knows it, the family knows it, and anyone lucky enough to be at our table on a grilled pizza night knows it too.

What we do is set up a full topping station right in the kitchen — every ingredient laid out, sauces, cheeses, herbs, all of it — and everyone builds their own. Family, friends, it doesn’t matter. You get your rolled out dough, you choose your toppings, and I handle the grill. It turns dinner into an experience, and people talk about it long after the evening is over.

Here are a few more ways to round out the meal:

  • Serve alongside a simple arugula salad dressed with lemon and olive oil for a true Italian pairing
  • A cold glass of Italian red wine or sparkling water with lemon makes it feel like a proper summer evening
  • Finish with a scoop of gelato if you really want to lean into the Italy theme

Before You Go

I may never have appreciated those summer trips to Italy the way my parents hoped I would. But somewhere along the way, between the memories and the grill experiments and the herbs, I found my way back to those flavors. This pizza won’t take you to Italy — but on a warm Oregon evening with the grill cranked up and fresh basil on hand, it gets closer than you’d think.

I hope you try it. And I hope one day I make it back to Italy to taste the original again.

The full grilling process is up on the YouTube channel — especially worth watching for the pre-bake step and how to read the crust for doneness.

Enjoy every bite,

Debbie

Grilled Pizza Recipe (Closer to Italy Than You Think!)

Difficulty: Beginner Prep Time 20 mins Cook Time 10 mins Total Time 30 mins
Cooking Temp: 600  F Servings: 12 Estimated Cost: $ 3
Best Season: Suitable throughout the year

Description

This easy grilled pizza recipe uses homemade dough, high heat, and simple Italian-inspired ingredients to create a crispy, charred crust and perfectly melted toppings. Cooked directly on the grill, it delivers the smoky flavor and texture of wood-fired pizza right in your own backyard.

Ingredients

Cooking Mode Disabled

Toppings

Instructions

  1. Combine warm water, yeast, and sugar in a large bowl. Stir gently and let sit for 10 minutes until foamy.
  2. Add flour, olive oil, salt, and garlic powder. Mix until a shaggy dough forms then knead by hand or with a stand mixer for 5 minutes until smooth and elastic.
  3. Cover and let rest in a warm place for 30 minutes.
  4. Divide dough in half and roll each piece out on a lightly floured surface to your desired thickness.
  5. Heat grill to at least 550°F to 600°F with the lid closed.
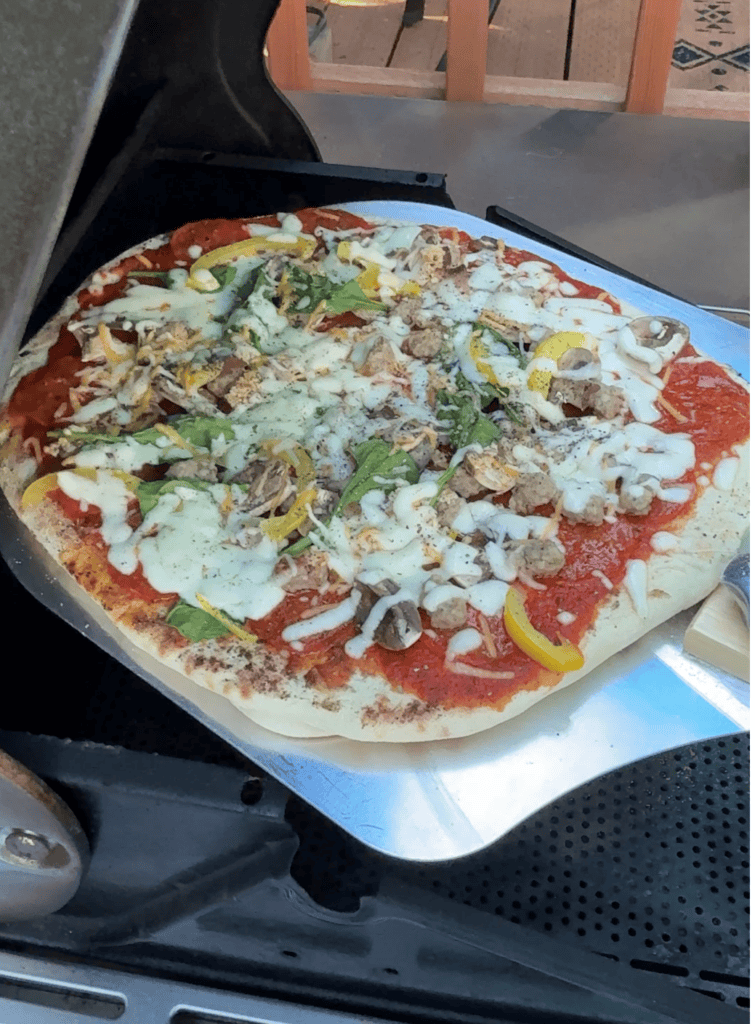
  6. Place rolled dough directly onto hot grill grates. Close lid and bake for 60 to 90 seconds — no longer.
  7. Remove from grill and flip so the grilled side faces up.
  8. Working quickly add sauce, toppings, and cheese to the grilled side.
  9. Return pizza to grill, crank heat as high as possible, close lid and cook until crust is blistery and charred at the edges and cheese is melted and bubbling.
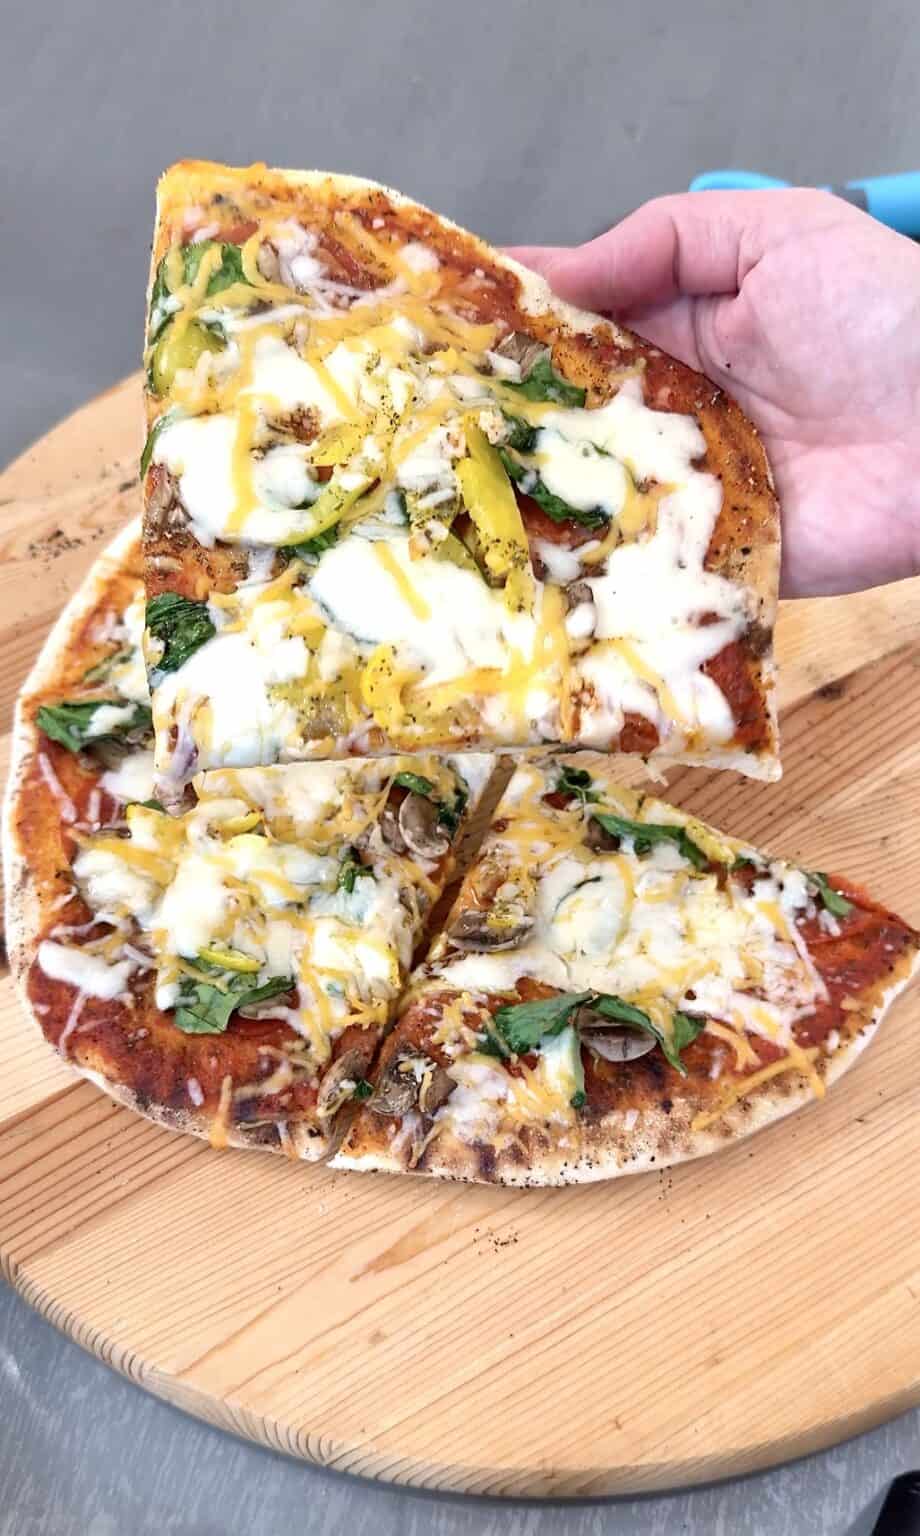
  10. Remove from grill, add fresh basil leaves and a drizzle of extra virgin olive oil. Slice and serve immediately.

Note

The 60 to 90 second pre-bake before adding toppings is non-negotiable — it prevents the dough from breaking under the weight of the toppings.Get your grill as hot as possible — 800°F is ideal for an authentic blistery crust.Add fresh basil after grilling, never before — the heat releases the oils without burning the leaves.Less is more with toppings — overloading prevents the crust from crisping properly.Store leftover pizza in the fridge for up to 3 days. Reheat in a hot skillet to keep the crust crispy.

Keywords: grilled pizza recipe, pizza on the grill, grilled pizza, homemade grilled pizza, how to grill pizza, grilled pizza dough, Italian pizza recipe, backyard pizza recipe, grilled pizza crust, wood fired pizza at home
Rate this recipe
Did you make this recipe?

Tag @debbieskitchencorner on Instagram and hashtag it #debbieskitchencornerrecipes so we can see all your recipes.

Pin this recipe and share it with your followers

pinit
Recipe Card powered by WP Delicious
Debbie Hauck - the face behind Debbies Kitchen Corner
Debbie Hauck Video and Food Content Creator

Hi, I am Debbie, a full-time YouTuber and Food Content Creator. I live in the Monmouth Oregon  with my family. Love traveling, sharing new recipes and hanging out with my kids.

Rate this recipe

Your email address will not be published. Required fields are marked *

Rate this recipe


Add a question

Your email address will not be published. Required fields are marked *


Min
Share it on your social network