Some recipes just have a way of bringing people together — no special occasion required. In our house, Ham and Cheese Sliders are that kind of food. Whether it’s football on TV, friends dropping by, or just a regular weekend when we want something fun and satisfying, these sliders always hit the spot. This easy ham and cheese sliders recipe is a go-to for family gatherings, parties, and quick snacks — perfect for anyone looking for a crowd-pleasing appetizer or game day food.
Today felt like one of those perfect slider days. My daughter suggested we whip up a batch and take some photos for the blog. Cooking side by side, laughing and layering cheese, reminded me why I love sharing these recipes so much. There’s a certain magic in simple, cozy food — especially when you can enjoy it with family and then share it with the world. These homemade sliders are not only delicious but also quick to prepare, making them an ideal choice for busy families and last-minute get-togethers.
Why You’ll Love This Slider Recipe
Perfect for Casual Gatherings: These sliders are made for sharing—think game day, movie night, or an easy snack for friends.
Irresistible Sauce: The buttery, garlicky, honey-mustard glaze with a hint of Worcestershire and a sprinkle of poppy seeds takes them over the top.
Quick and Easy: Minimal prep and simple ingredients mean you can whip these up in no time.
Customizable: Swap out the ham, cheese, add pineapple or even swap the bread to suit your taste or dietary needs.
Kid-Friendly: Gooey, cheesy, and finger-friendly—kids and adults both love them.
Make-Ahead Friendly: Assemble ahead and bake when you’re ready. Perfect for meal prep, potlucks, and picnics—these sliders travel and reheat well, too!
Here is some of the History
Sliders have become a favorite for casual American get-togethers, especially when it comes to sports or sharing snacks with friends. The term “slider” started with mini burgers, but today, it covers all sorts of bite-sized sandwiches. Our version, packed with ham and cheese and topped with a buttery, flavorful sauce, is inspired by the potluck and game day traditions I’ve come to love since moving to the US. While I don’t do big holiday spreads or birthday parties, I’ve found that these sliders are perfect for those spontaneous gatherings — when someone stops by to watch the game or when you just want to make a regular day feel a little more special. This recipe brings together the best of classic comfort food and modern party snacks, making it a staple for any host looking to impress.

⚖️ Comparisons
Compared to chips and dip or store-bought party trays, these homemade sliders offer something warm, melty, and truly comforting. Unlike a regular ham and cheese sandwich, baking these with the special sauce gives them a crisp, golden top and a gooey, savory center. They’re the kind of snack that disappears quickly and leaves everyone asking for seconds. Homemade ham and cheese sliders are a step above traditional party appetizers because they’re baked fresh and feature real ingredients you can taste.
Homemade vs. Storebought
You can find sliders at the grocery store, but they never taste quite as good as homemade. Making your own means you get to use real butter, fresh garlic, and your favorite cheese and ham. The sauce is what makes these truly special — no bottled dressing or shortcuts here. Plus, baking them at home fills your kitchen with the most amazing aroma. Making sliders from scratch lets you control the quality of ingredients and avoid preservatives found in store-bought versions.
📢 Fun Facts about Sliders
- The term “slider” was first popularized by White Castle, an American fast-food chain, in the 1940s. Their mini burgers were said to “slide right down” thanks to their small size and soft texture.
- Ham and cheese is a classic combination worldwide. In France, you’ll find “croque monsieur,” while in Germany, “Schinken-Käse-Brötchen” is a popular bakery staple.
- Poppy seeds have been used in baking for thousands of years. They add a subtle nutty flavor and a satisfying crunch to breads and pastries.
- You can make sliders in a slow cooker! Assemble as usual, then cook on low for about 2 hours for super-moist, party-ready sandwiches.
- Leftover sliders make a great next-day lunch. Just reheat in a toaster oven or microwave for a quick meal.
- Sliders are perfect for meal prepping. Assemble and freeze in advance, then bake straight from the freezer whenever you need a quick snack.
- You can turn these into breakfast sliders. Swap ham for cooked bacon or sausage, add a scrambled egg, and use your favorite cheese.
- The buttery sauce isn’t just for sliders. Brush it over roasted veggies or grilled chicken for a flavor boost.
- Sliders are a versatile recipe that can be adapted for breakfast, lunch, dinner, or snacks — making them a true family favorite.

💡Tips & Tricks and Recipe Variations
- ✅ Choose the Right Bread: Soft, pull-apart rolls (like Hawaiian rolls) soak up the sauce perfectly.
- ✅ Layer Cheese Strategically: Put cheese on both sides of the ham for maximum meltiness.
- ✅ Cover While Baking: Start covered to keep them moist, then uncover to brown the tops.
- ✅ Add a Kick: Mix in a pinch of cayenne or a dash of hot sauce to the glaze for a little heat.
- ✅ Switch Up the Meat: Turkey, roast beef, or even shredded chicken work well.
- ✅ Make it Vegetarian: Try grilled veggies or fruits (like pineapple) and your favorite cheese.
- ✅ Make Ahead: Assemble, cover, and refrigerate up to 24 hours before baking.
- ✅ Freeze for Later: Freeze unbaked sliders, then bake directly from frozen, adding a few extra minutes.
- ✅ For gluten-free sliders, use gluten-free rolls. For dairy-free, swap in plant-based cheese and butter.
🥜 Substitutions & Allergy Info
- Dairy-Free: Use plant-based butter and cheese.
- Gluten-Free: Use gluten-free rolls.
- Nut-Free: This recipe is naturally nut-free.
- Egg-Free: No eggs needed.
- No Honey? Substitute maple syrup or brown sugar.
- No Poppy Seeds? Use sesame seeds or skip them.
- This recipe is easy to adapt for most dietary needs, making it a great option for potlucks and parties with mixed guests.

Ingredient Spotlight
- Ham: Pick a good-quality deli ham or leftover baked ham for best flavor.
- Cheese: Swiss, cheddar, Gruyère, or provolone all work — mix and match for your favorite combo.
- Soft Rolls: Hawaiian rolls are classic, but any soft dinner roll will do.
- Butter: Real butter for richness and browning.
- Garlic: Freshly minced for the best flavor.
- Dijon Mustard: Adds tang and depth.
- Honey: Balances the savory with a touch of sweetness.
- Worcestershire Sauce: Gives the glaze a subtle umami punch.
- Poppy Seeds: For crunch and a little extra flavor.
- Parsley: Optional, for a fresh finish. Using fresh, high-quality ingredients is key to making these sliders extra delicious and memorable.
Instructions
- Preheat Oven: Preheat your oven to 350°F (175°C). Grease a 9×13-inch baking dish or line with parchment paper.
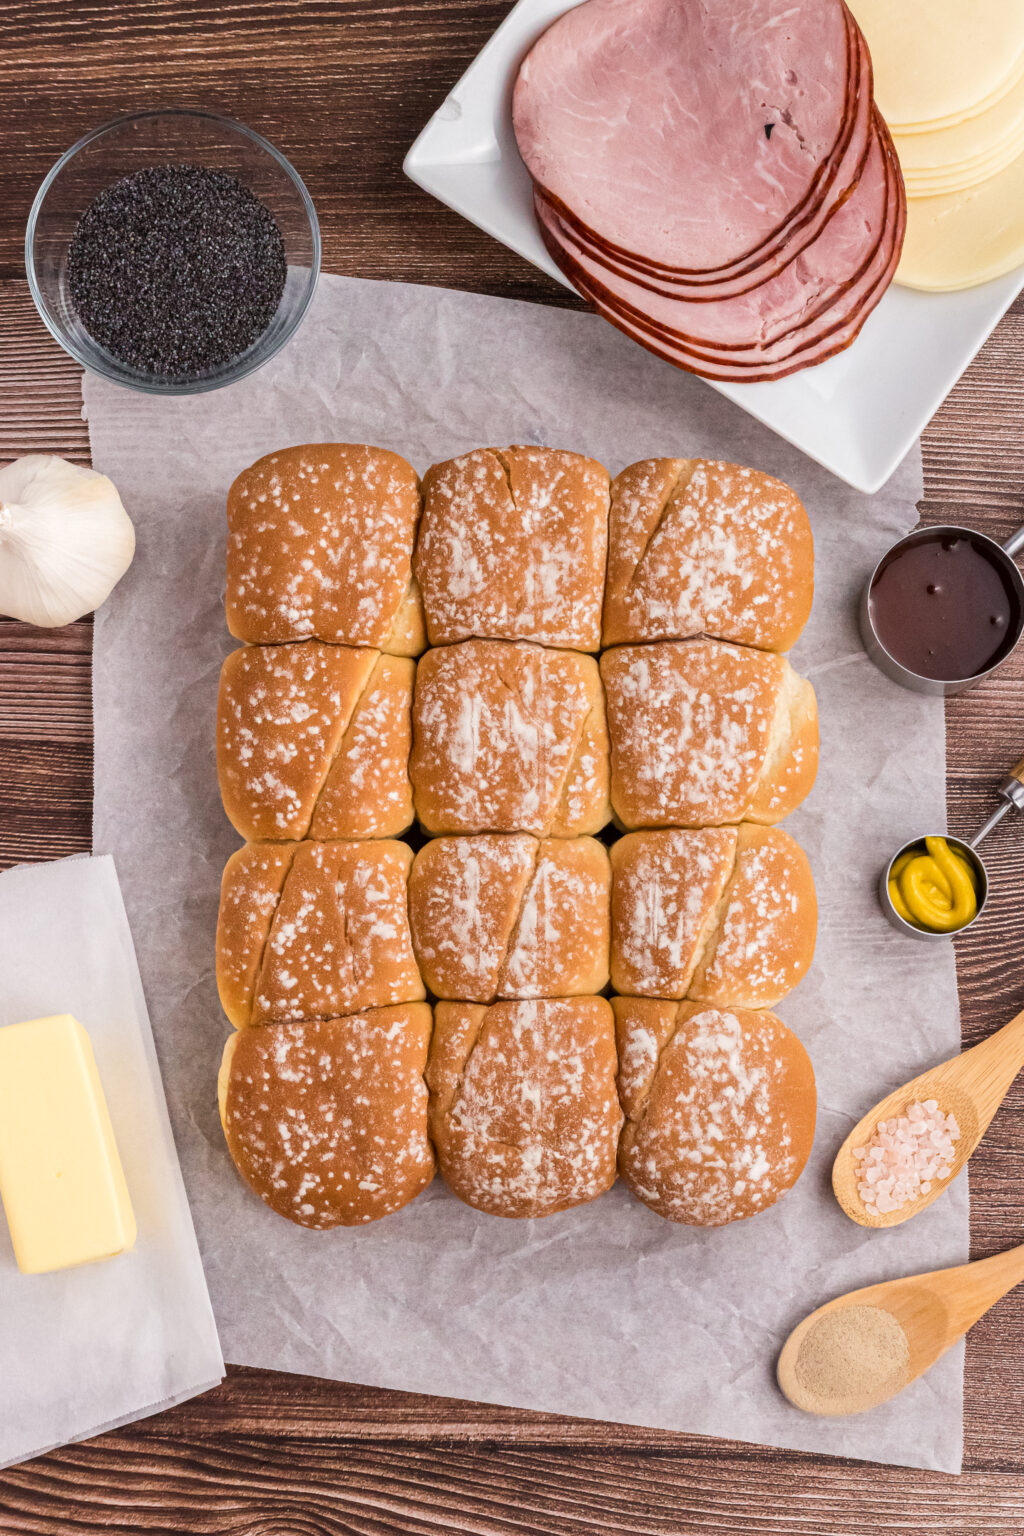
- Prepare Rolls: Slice the rolls in half horizontally (keep the bottoms and tops connected). Place the bottom halves in the baking dish.
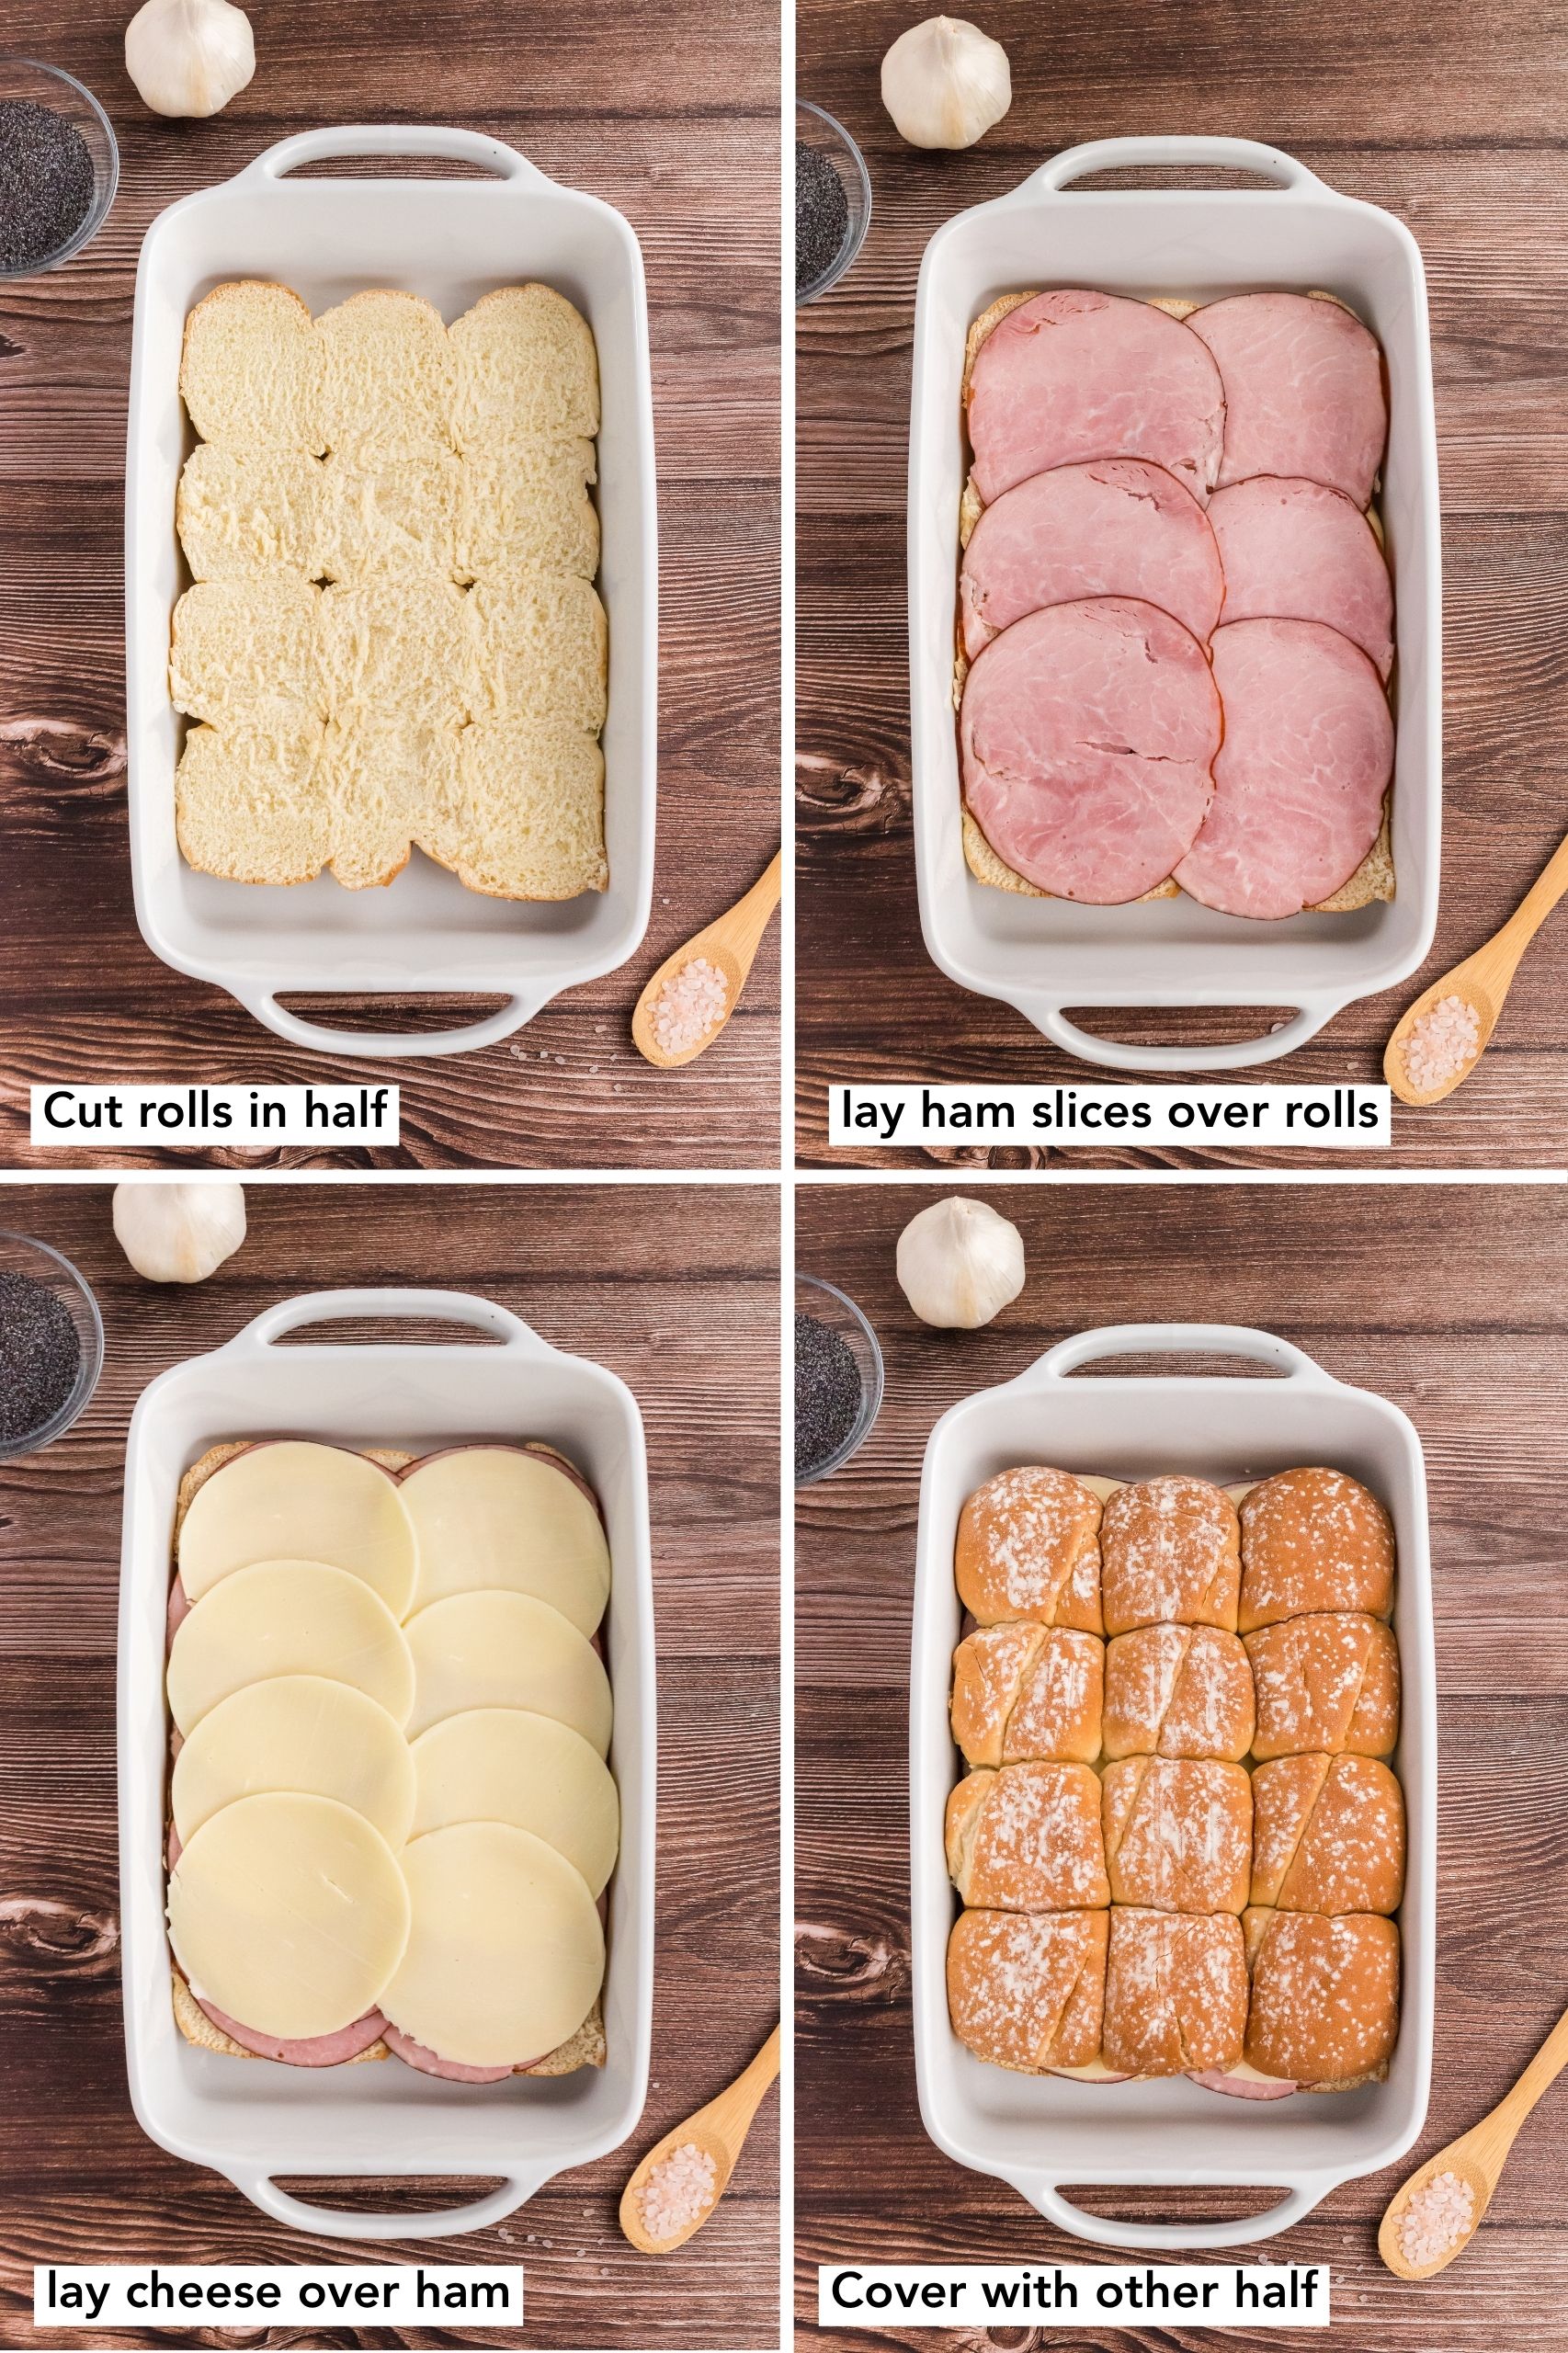
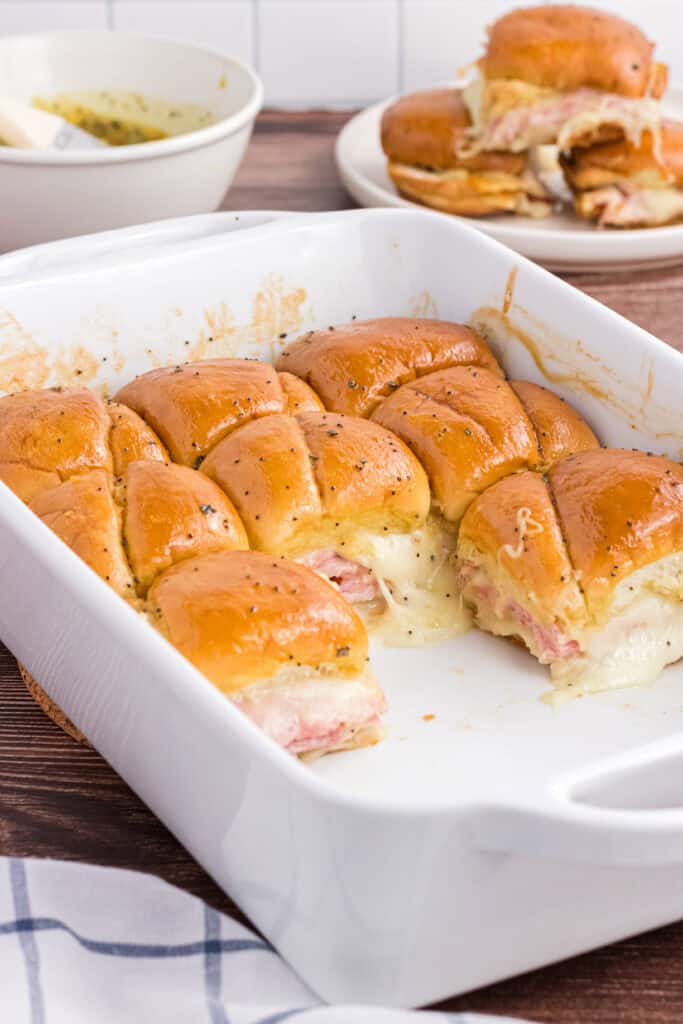
- Layer Ham and Cheese: Layer half the cheese on the rolls, then the ham, then the rest of the cheese. Place the tops of the rolls back on.
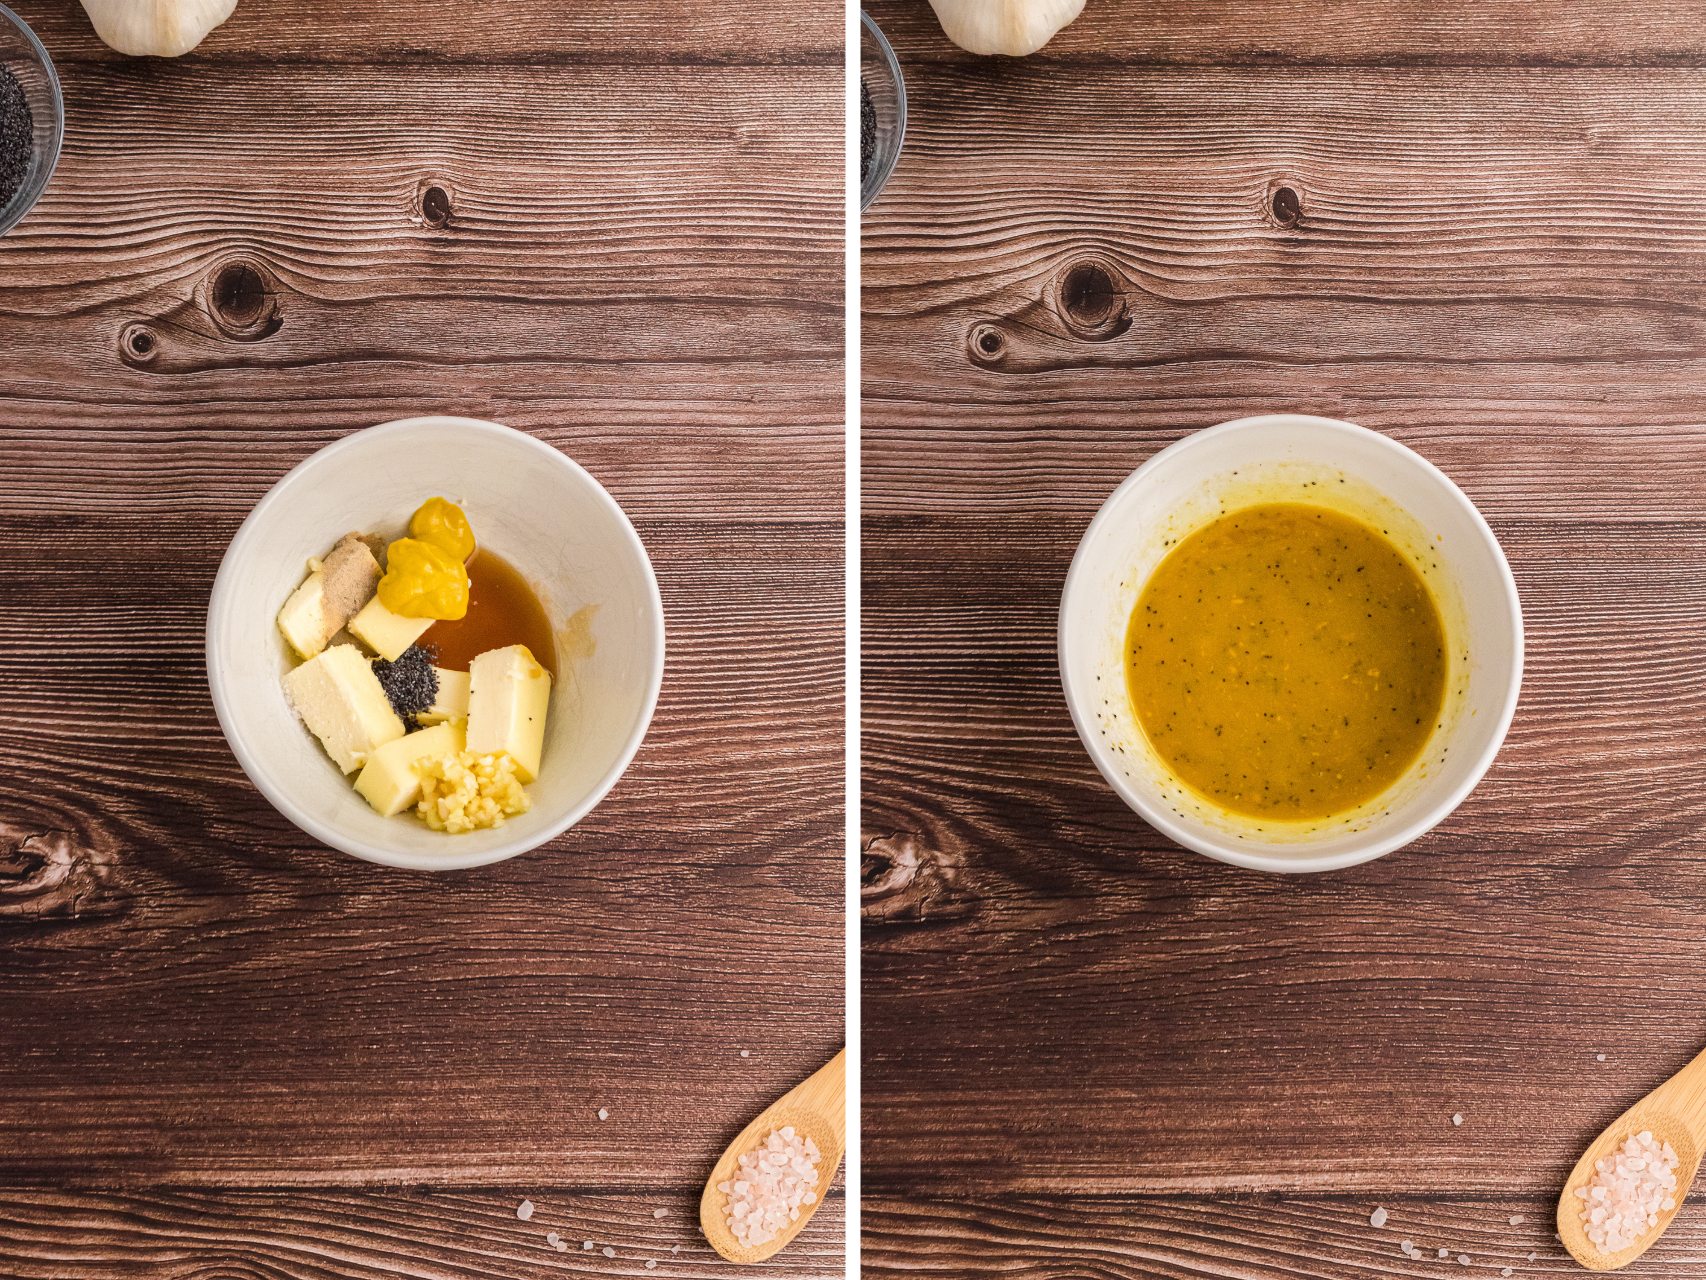
- Make the Sauce: In a small saucepan, melt the butter over medium heat. Add the minced garlic and sauté until fragrant (about 1 minute). Stir in honey, Dijon mustard, Worcestershire sauce, salt, pepper, and poppy seeds. Remove from heat and stir in fresh parsley if using.
- Brush with Sauce: Pour or brush the sauce evenly over the tops of the rolls, making sure to get all the nooks and crannies.
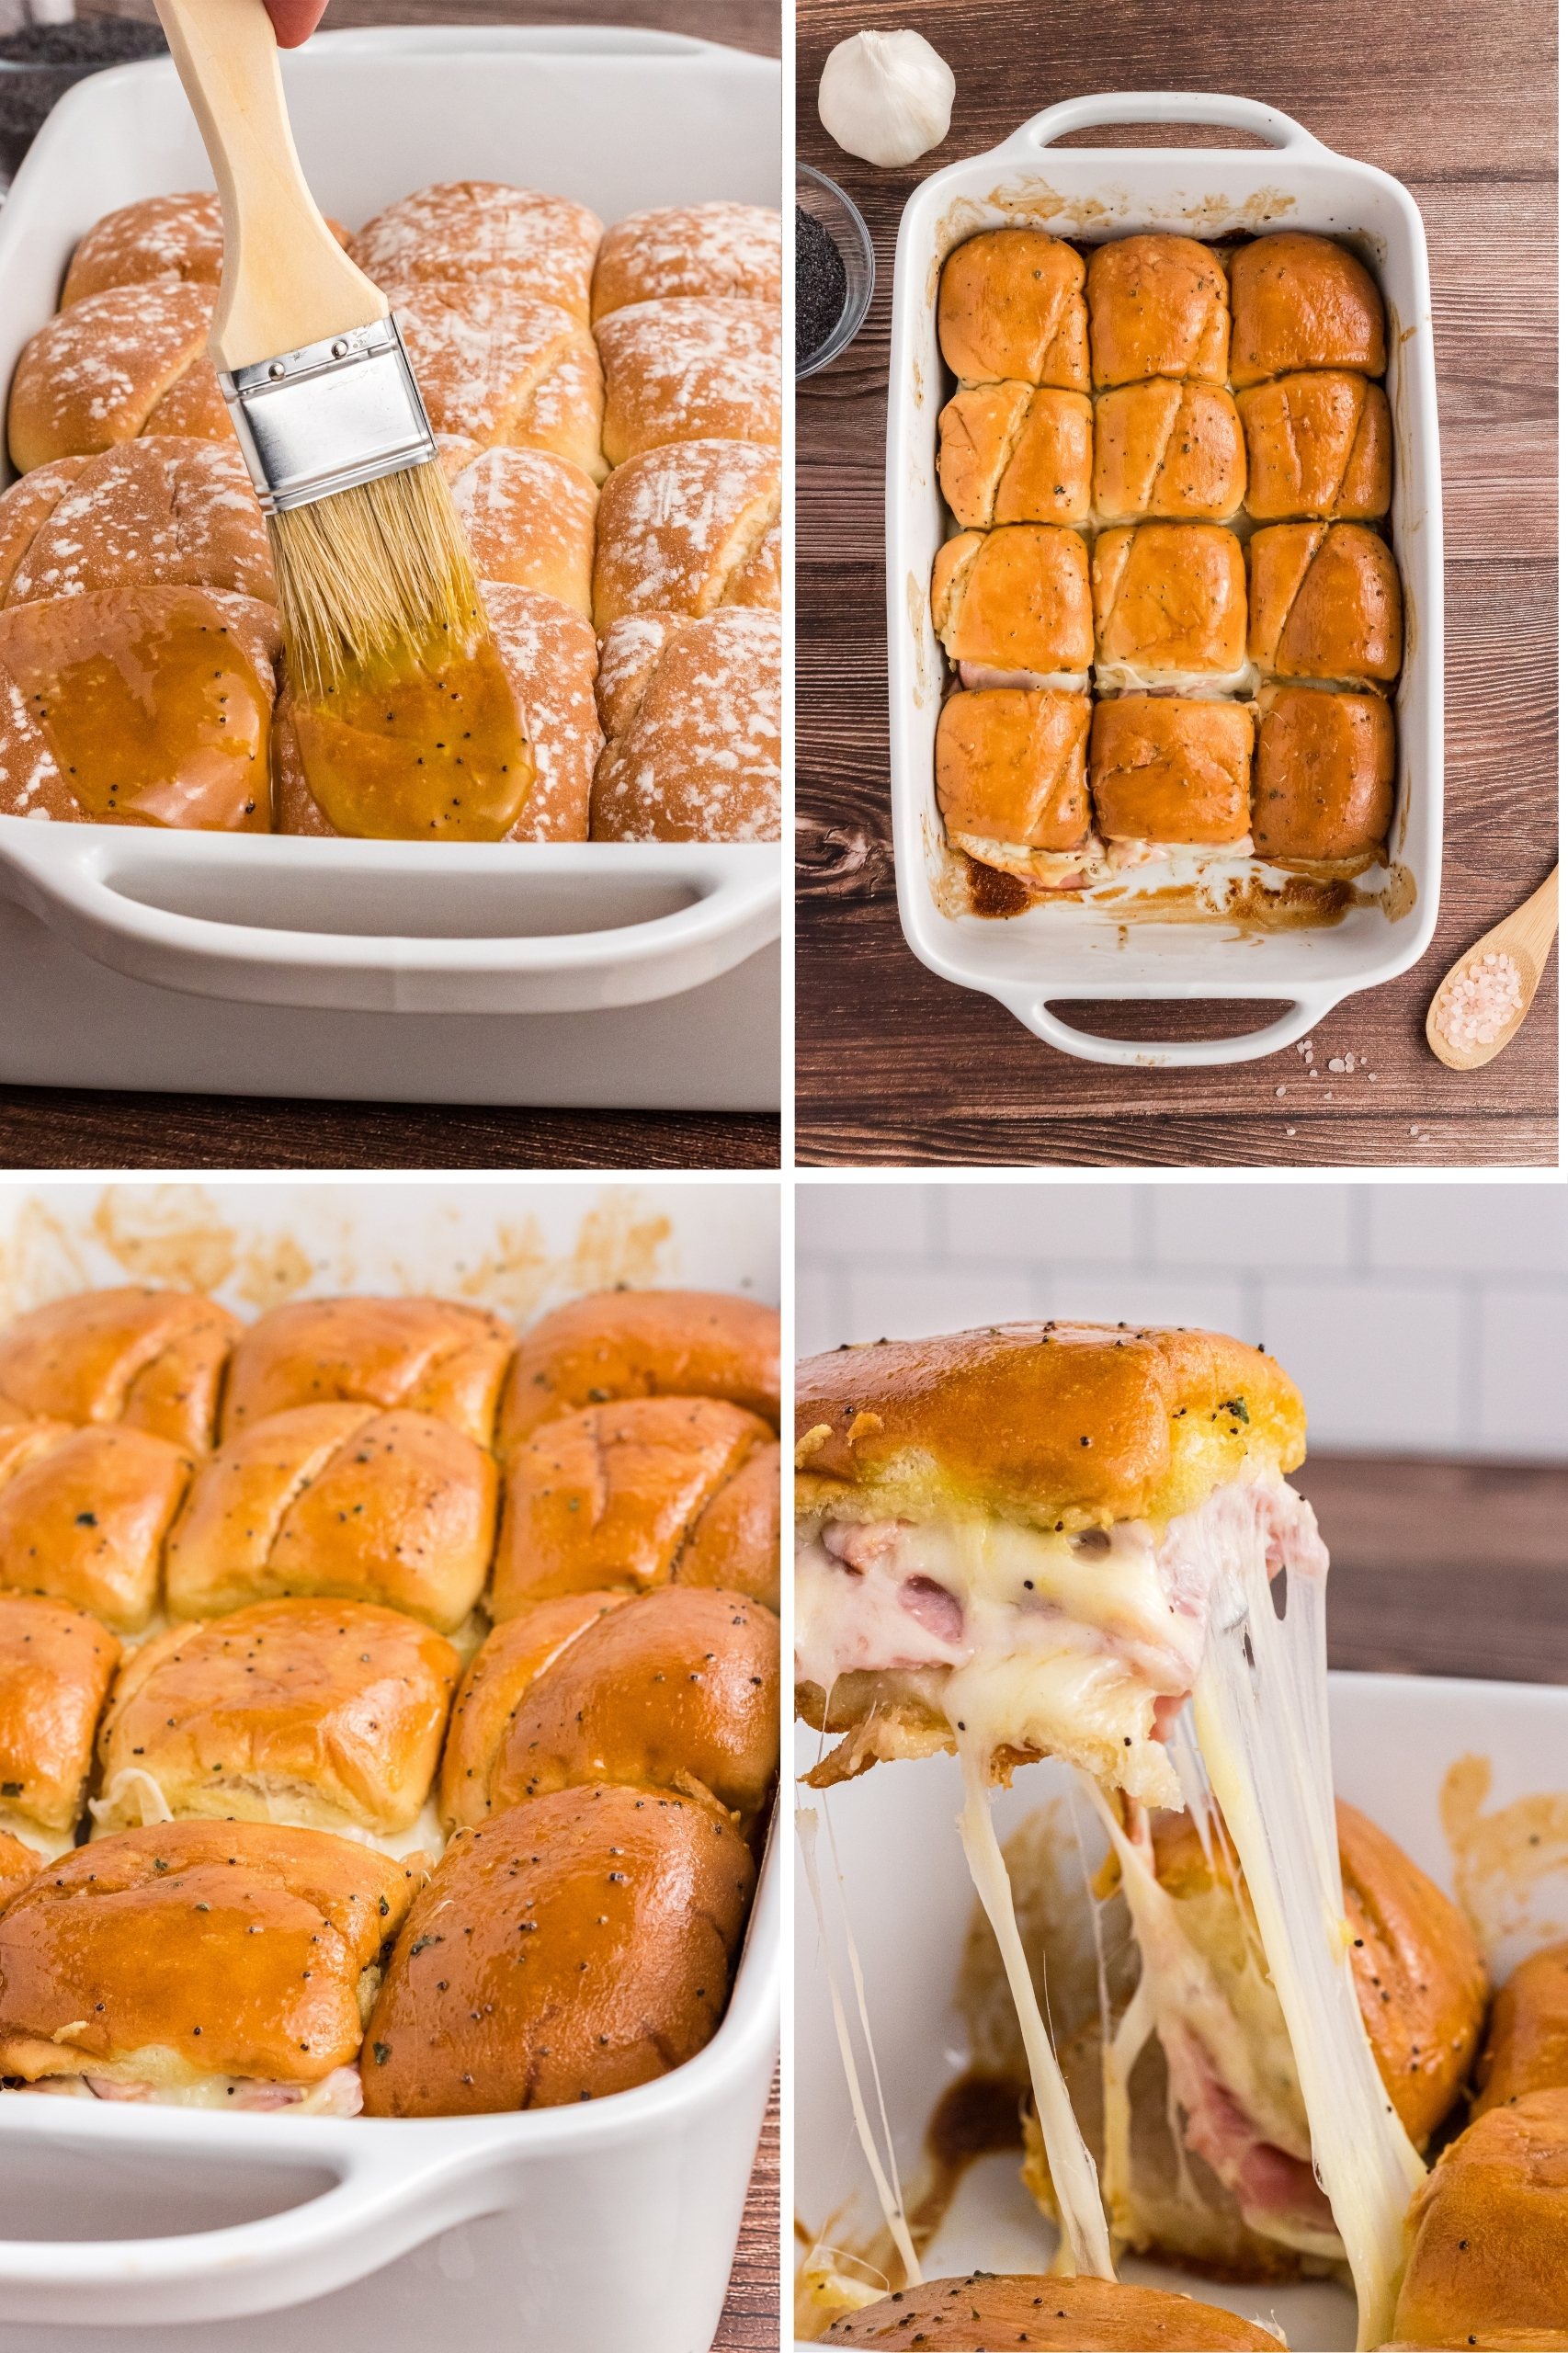
- Bake: Cover the dish with foil and bake for 20 minutes. Uncover and bake for another 5–8 minutes, until the tops are golden and the cheese is melted.
- Serve: Let cool for a few minutes, then slice and serve warm. These are best fresh, but leftovers reheat well. For best results, let sliders rest for 5 minutes before slicing to help the cheese set and make serving easier.
🫙Storage and Freezing
- Room Temp: Store leftovers in an airtight container at room temperature for up to 1 day.
- Refrigerate: Sliders will keep in the fridge for up to 3 days. Reheat in the oven or microwave.
- Freeze: Assemble sliders and freeze before baking. Bake straight from frozen, adding 10–15 extra minutes to the bake time. To avoid soggy bottoms, place a layer of parchment paper under the sliders before refrigerating or freezing.

FAQ – How to make perfect Sliders
- Q: Can I use different types of rolls?
A: Yes! Any soft dinner roll works — potato rolls, brioche, or even mini baguettes if you want a crustier bite. - Q: What’s the best way to keep the sliders warm for a crowd?
A: Cover the baking dish with foil and keep in a low oven (about 200°F) until ready to serve. - Q: Can I assemble these ahead and bake later?
A: Definitely! Prep them up to a day in advance, cover tightly, and refrigerate. Bake just before serving. - Q: Can I make these in a toaster oven?
A: Yes, just use a small baking dish and watch the bake time — it may be a bit quicker. - Q: What’s the best cheese for extra gooey sliders?
A: Mozzarella, havarti, and provolone are especially melty. Mix with cheddar or Swiss for flavor. - Q: Are these good for picnics?
A: Absolutely! Bake, cool, and pack in an airtight container. They’re tasty at room temp, too. - Q: Can I add veggies inside?
A: Sure! Thinly sliced tomatoes, sautéed mushrooms, or baby spinach are great additions. - Q: How do I make these less sweet?
A: Use less honey in the sauce or skip it for a more savory glaze. - Q: Can I make a big batch for a crowd?
A: Yes, just double or triple the recipe and use a larger baking sheet. - Q: What if I don’t have poppy seeds?
A: You can substitute sesame seeds or leave them out entirely. These sliders are so flexible, you can easily adapt them to your taste and occasion!
Troubleshooting Tips
- Soggy Bottoms: If your sliders turn out soggy, try toasting the bottom halves of the rolls for a few minutes before assembling. Also, avoid adding too much sauce—brush it on lightly for even coverage.
- Cheese Not Melting: If the cheese isn’t melting enough, bake covered for a few extra minutes, then uncover and finish until bubbly. You can also use thinner cheese slices for quicker melting.
- Rolls Getting Too Dark: If the tops brown too quickly, tent loosely with foil for the remainder of the baking time. Every oven is a little different, so check at the 15-minute mark. If you want crispier tops, brush with a little extra melted butter before the final bake.
Wrapping Up
Ham and Cheese Sliders have become a favorite in our home — not for holidays or big celebrations, but for the simple, everyday moments that matter most. Whether it’s football on TV, a spontaneous family gathering, or just a craving for something warm and cheesy, these sliders always deliver. Making these with my daughter today was a reminder that good food is about more than just recipes — it’s about sharing, connecting, and making memories. I hope you’ll give these a try next time you’re looking for the perfect snack to share.
⭐️ For more easy recipes, tips, and kitchen inspiration, subscribe to my newsletter or follow me on Instagram!

Ham and Cheese Sliders: The Ultimate Snack for Game Day and Gatherings
These ham and cheese sliders are quick, easy, and bursting with flavor thanks to a signature buttery sauce. A guaranteed hit for any casual get-together!
Author:
Debbie Hauck
Cooking Method:
Baking
Cuisine:
American
Courses:
Dinner
Recipe Keys:
Quick Meals
Prep Time
15 mins
Cook Time
30 mins
Total Time
45 mins
Difficulty:
Beginner
Cooking Temp:
375
F
Estimated Cost:
$ 6
Best Season:
Suitable throughout the year
Keywords:
ham and cheese sliders, party sliders, easy slider recipe, football snacks, honey mustard sliders, poppy seed sliders, family recipe, crowd-pleaser, make ahead sliders, cheesy sliders, game day food
Rate this recipe